
Introduction: When My Fridge Became a Salad Bar
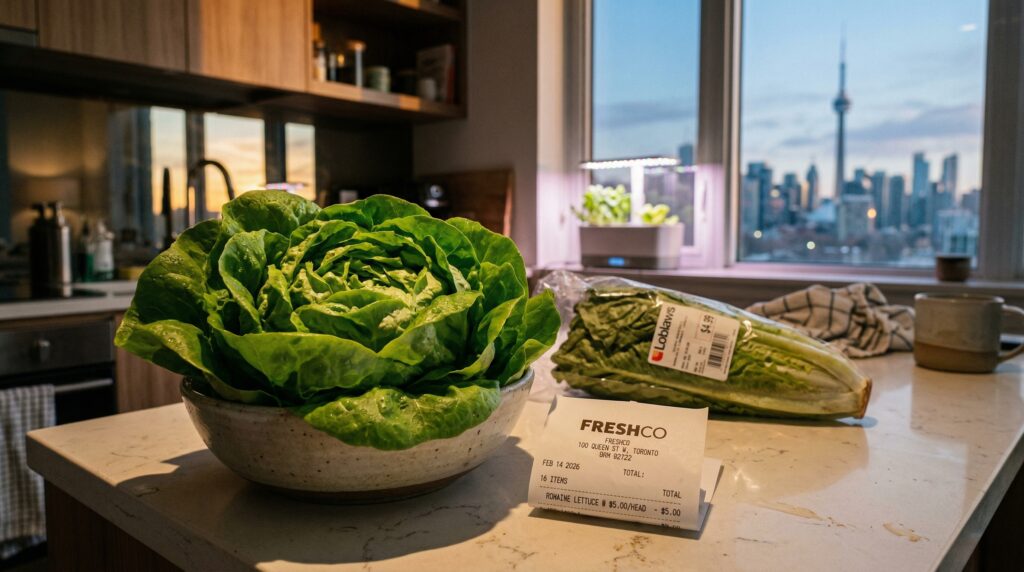
In my experience testing different urban growing methods over the past three years, I have learned that nothing makes you feel quite as powerless as watching a $7 bag of organic spinach turn into green slime three days after you buy it. I live in a small apartment in Toronto, and like millions of city dwellers around the world, I have watched my grocery bills climb relentlessly. According to the 2026 Canada Food Price Report, a typical Canadian family of four will spend approximately $17,571.79 on food this year — an increase of nearly $1,000 from 2025. And Canada’s food inflation, while easing slightly to 5.4 percent in early 2026, still remains the highest among G7 nations.
That number stopped me cold. I realized I could either keep handing my hard-earned money to the grocery store or I could take matters into my own hands. That is when I discovered hydroponic leafy greens.
When I transitioned my kitchen counter from a cluttered catch-all space to a thriving indoor salad bar, I did not just save money. I reclaimed control over what my family eats. This is not about becoming a full-scale farmer. It is about growing sustainable, pesticide-free leafy greens year-round, no matter where you live or what the season looks like outside your window.
The 2026 Reality: Why Leafy Greens Are the Perfect Starting Point
Here is what I have learned after growing dozens of lettuce, kale, and spinach varieties indoors. Leafy greens are the gateway crop for home hydroponics. They grow fast, require minimal space, and forgive beginner mistakes better than almost any other edible plant.
The numbers speak for themselves. A typical household consuming two containers of pre-washed greens per week at six dollars each spends $12 weekly, or $624 annually. If you prefer organic or eat more greens, that number can easily exceed $800 per year. Meanwhile, a basic hydroponic setup for leafy greens costs between $100 and $200 upfront, with ongoing monthly expenses of just $10 to $28 for nutrients, electricity, and water.
But the financial argument only tells part of the story. What truly converted me was the quality. The lettuce I grow in my kitchen tastes dramatically better than anything I have ever bought from a store. It is crisp, sweet, and stays fresh for weeks in the refrigerator instead of days. And I know exactly what went into growing it — nothing but water, minerals, and light.
Globally, hydroponic leafy green production is exploding. In Singapore, the world’s tallest indoor vertical farm opened in January 2026, producing 2,000 tonnes of greens annually including kailan, lettuce, arugula, and spinach. In India, hydroponic farming is gaining traction as cities demand cleaner, fresher produce. And in the Philippines, the city of Baguio launched a hydroponics program across five barangays that has already harvested 280 kilograms of lettuce, pechay, and bok choy for community feeding programs.
What these global developments tell me is that growing your own greens is not just a hobby for wealthy urbanites. It is becoming a mainstream food security strategy for people everywhere.
Which Leafy Greens Grow Best Hydroponically?
Through trial and error — and plenty of failures along the way — I have settled on three leafy greens that consistently thrive in home hydroponic systems.
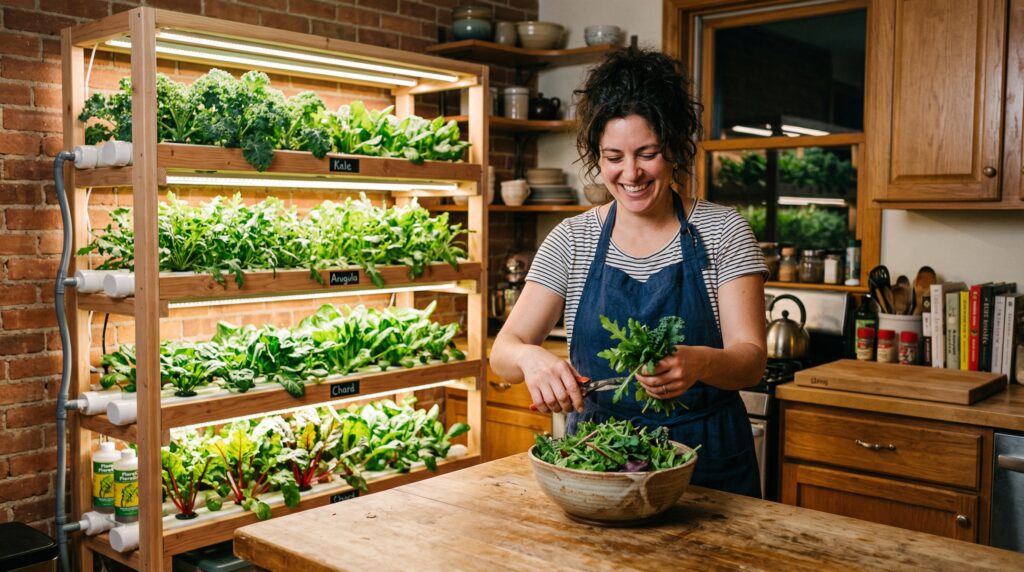
Lettuce is the undisputed champion. It grows fast, stays compact, and tolerates a wide range of conditions. I have successfully grown butterhead, romaine, and loose-leaf varieties with minimal effort. In nutrient film technique systems, lettuce can be planted at densities of 25 to 30 plants per square meter.
Kale takes a little longer — about eight weeks from seed to harvest — but the payoff is enormous. One plant keeps producing leaves for months using the cut-and-come-again method. Recommended density for kale is about 20 to 25 plants per square meter.
Spinach sits somewhere in between. It grows quickly, handles cooler temperatures well, and produces tender leaves ideal for salads and smoothies. Spinach thrives at higher densities of 40 to 50 plants per square meter.
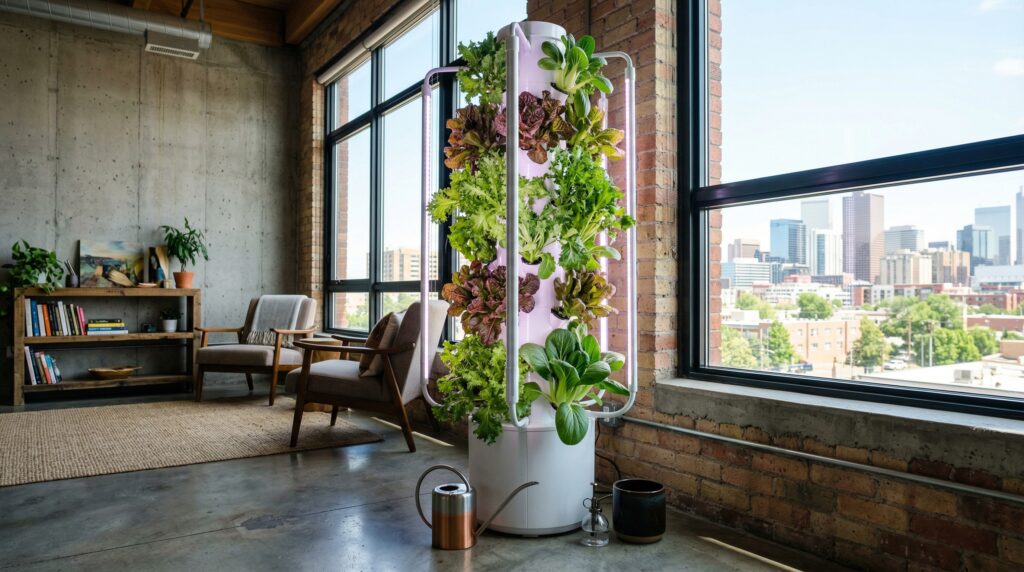
What about space efficiency? This is where hydroponics truly shines. A vertical hydroponic column planter occupying just one square foot of floor area can support over 30 plants — equivalent to five to six square feet of flat planting space. For apartment dwellers like me, that is a game-changer.
Four Hydroponic Methods for Growing Leafy Greens at Home
Over the past two years, I have experimented with four different hydroponic methods. Each has its strengths, and the right choice depends on your budget, space, and appetite for tinkering.
The Kratky Method: Passive and Foolproof
When I first started, I was intimidated by pumps and timers. That is why I began with the Kratky method. Developed by Dr. Bernard Kratky, this passive hydroponic system requires no electricity, no pumps, and almost no maintenance. Plants sit in net pots above a container of nutrient solution. As the plants grow and consume water, the water level drops, creating an air gap that delivers oxygen directly to the roots.
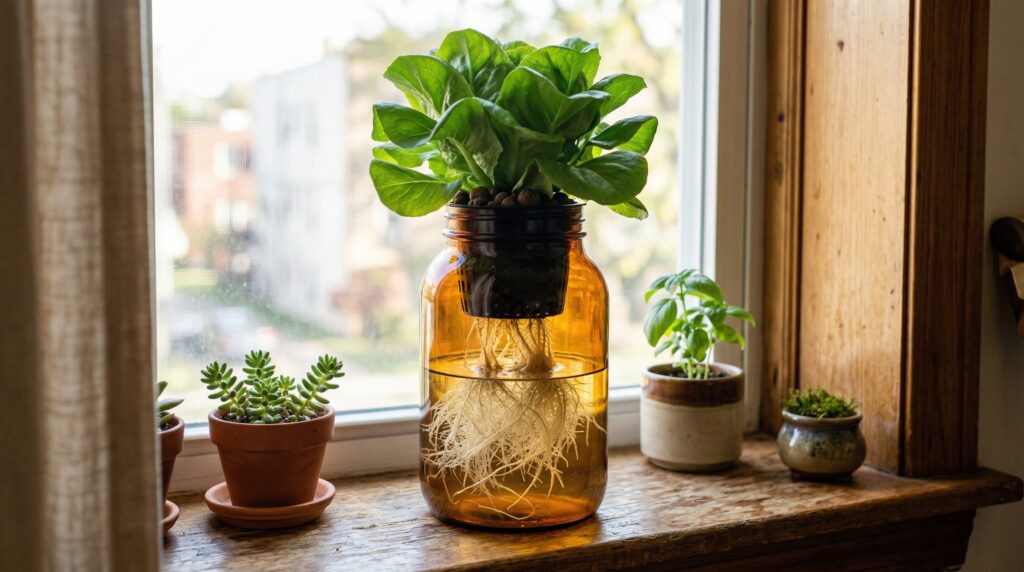
For leafy greens, the Kratky method is nearly perfect. I grew my first batch of butterhead lettuce in a repurposed storage tub on my balcony. The total cost was under $50. The lettuce was ready in six weeks. No pumps. No noise. No complicated schedules.
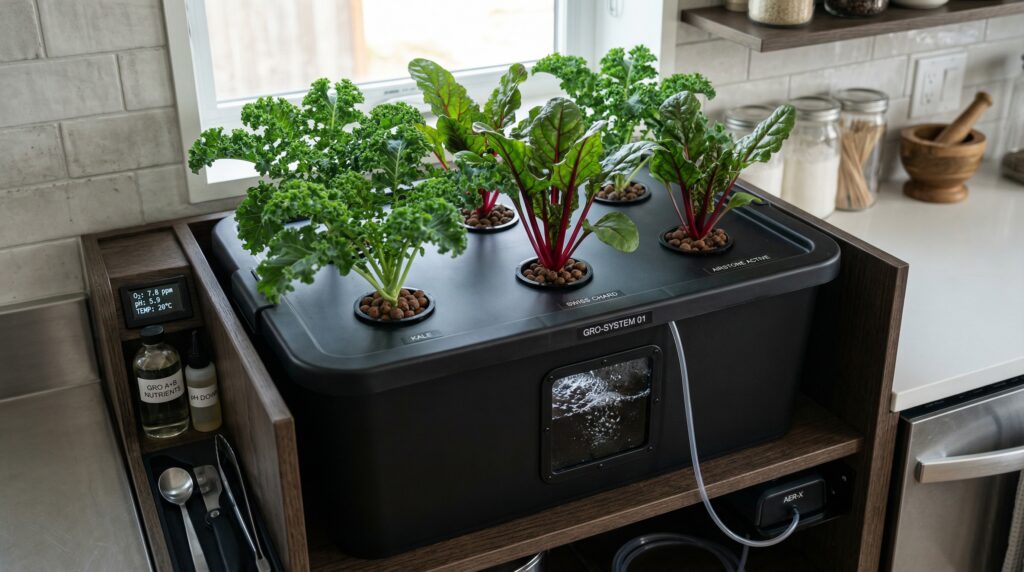
Deep Water Culture: Fast Growth for Serious Yield
Once I caught the hydroponic bug, I upgraded to a Deep Water Culture system. In DWC, plant roots are suspended directly in oxygenated nutrient solution. An air pump keeps the water bubbling, ensuring roots never suffocate.
DWC grows plants noticeably faster than Kratky. My kale in the DWC system matured nearly two weeks earlier than my previous Kratky-grown kale. The trade-off is that you need an air pump and electricity, but the electricity cost is minimal — a small pump running 24 hours a day adds only a few dollars to your monthly bill.
Nutrient Film Technique: Continuous Flow for Larger Setups
For those with more space and ambition, NFT systems circulate a thin film of nutrient solution through sloped channels. The roots spread out along the channel floor, absorbing nutrients from the flowing water.
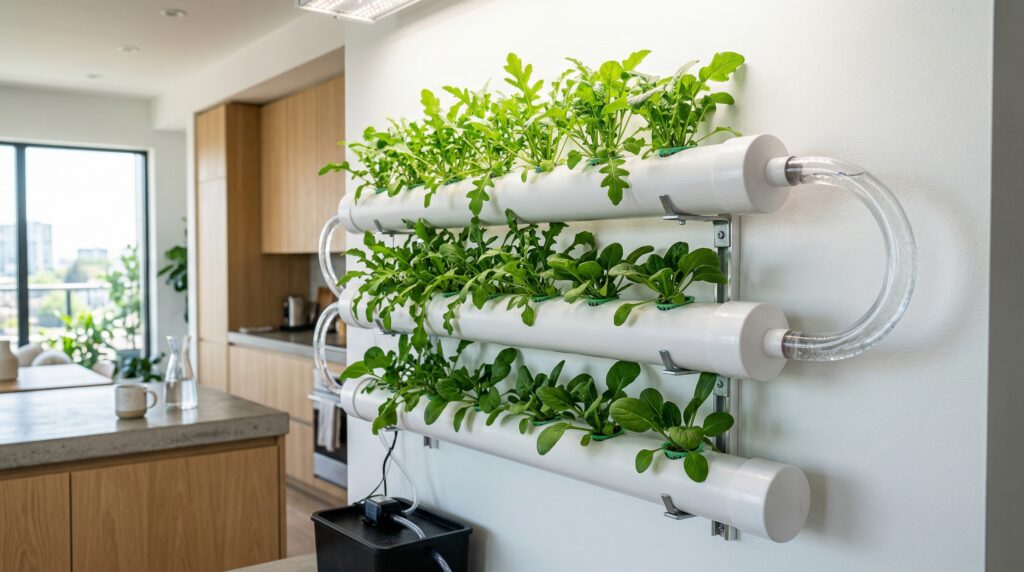
I built a small NFT system using PVC pipes and a submersible pump. It worked beautifully for lettuce and basil but required more careful monitoring of flow rate and channel slope. For beginners, I recommend starting with Kratky or DWC before tackling NFT.
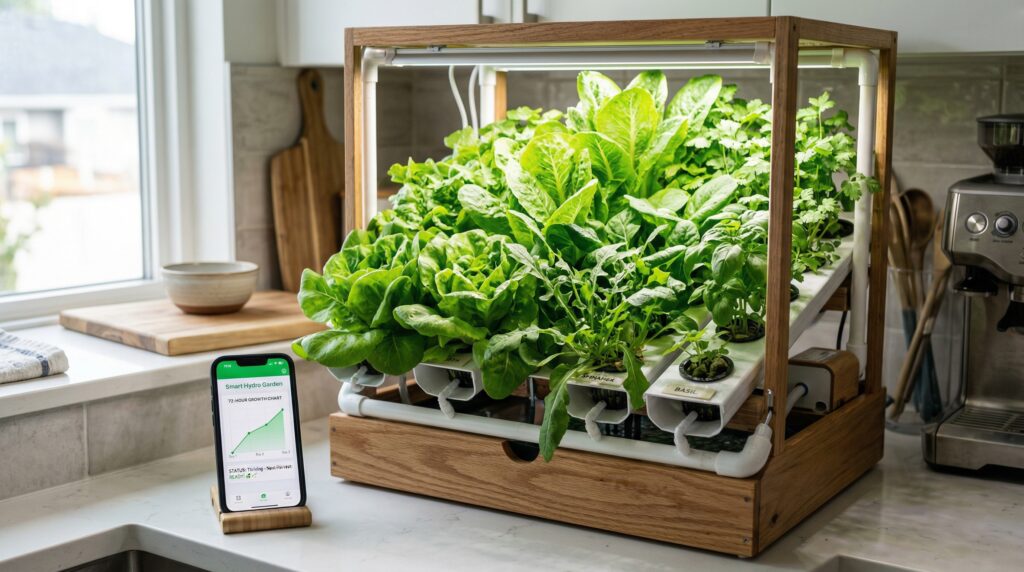
All-in-One Smart Systems: Convenience Without Compromise
When my parents asked me to help them start growing their own greens, I did not hand them a bucket and an air pump. I bought them an all-in-one smart hydroponic system — an iDOO kit that includes an LED grow light, pump, and timer in a compact countertop unit.
These systems are more expensive upfront, typically $80 to $150, but they remove almost all learning curves. My parents — who had never grown anything in their lives — were harvesting lettuce within five weeks. The built-in timer automates the light cycle. The pump circulates water automatically. All they do is add nutrients every two weeks and harvest when ready.
The Real Cost Breakdown: Grocery Store vs. Hydroponic Home Growing
I am a numbers person, so I tracked every expense meticulously during my first year of hydroponic growing. Here is what the data actually looks like.
Grocery store baseline. A household buying two containers of pre-washed organic salad mix per week at $7 each spends $728 annually. Even buying whole heads instead of pre-cut bags reduces spending by maybe 30 percent, but you still deal with spoilage and plastic waste.
Hydroponic first-year costs. My initial setup for a two-bucket DWC system cost $120, including the air pump, tubing, net pots, grow medium, and a basic LED grow light. Nutrient solution for leafy greens costs about $15 per bottle and lasts two to three months. Electricity for the air pump and LED light adds roughly $8 per month. Seeds cost virtually nothing — a $4 seed packet lasts multiple growing cycles.
Adding it all up: $120 initial setup plus $70 in nutrients for the year plus $96 in electricity equals $286 for the entire first year. That is less than half of what I would have spent at the grocery store.
Year two and beyond. The math gets even better once the system is paid for. Ongoing costs drop to about $15 per month for nutrients and electricity — just $180 annually. Compared to $728 at the store, I am saving nearly $550 every single year.
But here is what the raw numbers miss. I no longer throw away wilted greens. I no longer drive to the store midweek because I ran out of lettuce for sandwiches. And I no longer wonder whether “organic” actually means pesticide-free — because I control everything that touches my plants.
How Real People Are Growing Their Own Greens
One of my favorite discoveries on this journey has been the vibrant community of home hydroponic growers sharing their experiences online. Their stories are not just inspiring — they provide the kind of firsthand insights that no commercial guide can offer.
I came across a growing diary from someone named Miki, an urban professional who turned a tiny apartment corner into a thriving hydroponic farm using a vertical tower. She documented everything from the first tiny white roots emerging in week one to harvesting crisp lettuce, snap peas, and strawberries by week nine. Her description of hand-pollinating strawberry flowers with a soft paintbrush because there are no natural pollinators indoors was exactly the kind of practical detail that helped me troubleshoot my own early attempts.
Another grower shared how they consistently produce over 30 percent of their own vegetables in a small urban apartment, describing the practice as “rewarding, sustainable, and a constant supply of fresh produce”. In a shipping container in North America, one farm grows 9,000 leafy greens simultaneously in just 326 square feet, with each head of lettuce maturing under LED lights.
And then there is the story from Norway House Cree Nation in Manitoba, where an Ottawa-based startup helped bring hydroponic farming to a remote Indigenous community. In a place where the outdoor growing season lasts barely two months, they now grow spinach, butterhead lettuce, bok choy, and herbs year-round inside a climate-controlled unit.
These stories remind me that hydroponic growing is not about technology for technology’s sake. It is about food security, community resilience, and the simple pleasure of eating food you grew yourself.
How to Set Up Your First Hydroponic Leafy Green Garden
After dozens of experiments — and plenty of failures — I have distilled the process into a simple, repeatable system for beginners.
Step 1: Choose Your Method
| Your Situation | Recommended Method |
| Absolute beginner, minimal budget | Kratky method (under $50) |
| Want faster growth, okay with pump | Deep Water Culture ($80–$150) |
| No time to learn, want plug-and-play | All-in-one smart system ($85–$150) |
| Larger space, want continuous harvest | NFT system (DIY or kit, $150–$300) |
Step 2: Gather Your Materials
For a basic DWC setup, you will need:
- A dark-colored plastic container with lid (to prevent algae)
- Net pots (2 to 3 inches in diameter)
- Hydroponic growing medium (clay pebbles or rockwool cubes)
- An air pump and air stone
- Hydroponic nutrient solution formulated for leafy greens
- A pH test kit or meter
- LED grow lights (if growing indoors without natural light)
Step 3: Set Up and Plant
Cut holes in the container lid to fit your net pots. Fill the container with water and add nutrients according to the manufacturer’s instructions. Place your seedlings — started in rockwool cubes or directly in net pots — into the holes so the roots touch the nutrient solution. Connect the air pump to the air stone, place the stone in the bottom of the container, and turn it on.
Step 4: Maintain Your System
Here is the part that surprised me. Hydroponic systems require far less maintenance than I expected. Check the pH weekly and keep it between 5.5 and 6.5. Replace the nutrient solution entirely every two to three weeks. Top off the water as needed between changes. Keep the reservoir covered to block light and prevent algae.
Step 5: Harvest and Enjoy
Most leafy greens are ready to harvest in four to six weeks. Use the cut-and-come-again method for lettuce and kale — harvest the outer leaves and leave the inner growth to continue producing. One healthy kale plant kept me in fresh greens for over four months.
Common Beginner Mistakes — And How I Learned From Them
I have made almost every mistake possible in my hydroponic journey. Here are the ones I see other beginners repeat most often.
Mistake 1: Overcomplicating the first system. I started with an elaborate NFT setup that required constant tinkering. I should have begun with a simple Kratky or DWC system. Start small. Master the basics. Then expand.
Mistake 2: Ignoring pH. My first batch of lettuce turned yellow and stopped growing because I never checked pH. Once I started testing weekly — and adjusted using pH up and pH down solutions — the plants took off. A good pH meter costs $20 to $30 and pays for itself immediately.
Mistake 3: Using regular tap water without treatment. Tap water often contains chlorine and chloramines that harm beneficial root bacteria. I now use filtered water or let tap water sit uncovered for 24 hours before using it in my system.
Mistake 4: Growing too many plants too close together. Cramming more plants into your system does not increase yield. Overcrowding reduces airflow, encourages disease, and stunts growth. Follow the spacing recommendations for your chosen method.
The Global Movement: Hydroponics for Community Food Security
What started as my personal kitchen project connects to something much larger. Around the world, communities are turning to hydroponic leafy greens as a solution to food insecurity.
In Laredo, Texas, a community garden now uses 3D-printed hydroponic towers to grow fresh food. The towers hold 15 pods each, and local students with behavioral challenges have shown remarkable improvements in mental health and social skills through participating in the garden.
In Uganda, a 115-square-metre hydroponic school garden grows about 650 plants without soil, using minimal water and organic fertilizers. The system is harvested year-round, providing fresh vegetables for school meals in a region where nutritional options are often limited.
In the Philippines, the LOVE Garden hydroponics project in Pasay City launched through a partnership between Newport World Resorts and the local barangay, donating seedlings and a full NFT hydroponic system to promote sustainable agriculture.
These initiatives prove that hydroponic leafy green production is scalable from a single mason jar on a kitchen counter to a community-wide food security program. The principles are the same. Only the scale changes.
SmartWealth Tip: The “Salad Tax” Exit Strategy
In 2026, the average household is projected to spend over $17,500 annually on food. If you are a heavy consumer of organic greens, you are likely paying a hidden “convenience tax” of $600 to $800 per year to the grocery store.
- The Year 1 ROI: By investing in a basic $120 DWC setup, your total first-year expense (including nutrients and electricity) sits at roughly $286. This effectively slashes your salad budget by over 50% immediately.
- The “Infinite Harvest” Bonus: Once your equipment is paid off, your ongoing cost for fresh, pesticide-free greens drops to just $15 per month. That is roughly $180 a year to replace what would cost you $728 at a big-box retailer.
- Wealth Hack: To maximize your ROI, prioritize Kale and Swiss Chard. Using the “cut-and-come-again” method, a single healthy plant can provide a continuous harvest for over four months, eliminating the need to buy new seeds or pods every few weeks.
Looking Ahead: The Future of Home Hydroponics
By 2030, I expect home hydroponic systems to become as common as coffee makers. The technology is already there. The cost barriers are falling. And the economic pressures — rising grocery prices, climate volatility disrupting supply chains, and growing demand for pesticide-free local food — are only going to intensify.
What I am most excited about is the integration of AI and IoT sensors into home systems. Smart hydroponic gardens that monitor pH, EC, temperature, and humidity automatically — and adjust conditions in real time — are already on the market. By 2027, I expect fully automated systems under $200 that require nothing more than adding water and harvesting.
But even without the smart features, the basic principles work. Nutrient solution. Water. Light. Seeds. That is all it takes to grow fresh, pesticide-free leafy greens in your own home.
Conclusion: Your Indoor Salad Bar Awaits
When I look back at the person I was three years ago — frustrated by rising grocery bills, tired of wilted greens, skeptical about my ability to grow anything — I barely recognize myself. Today, I walk to my kitchen counter, snip fresh kale for my morning smoothie, and watch my lettuce grow inches overnight under the LED lights.
The math is clear. Hydroponic leafy greens save money, reduce waste, eliminate pesticide concerns, and provide fresh food year-round regardless of season or climate. The technology is accessible. The learning curve is manageable. And the rewards go far beyond the financial savings.
In my experience, the single biggest barrier is not cost or complexity. It is the belief that you cannot do it. You can. Start with a single mason jar of Kratky lettuce on a sunny windowsill. In six weeks, when you are eating a salad made from greens you grew yourself — with no plastic packaging, no carbon footprint, and no pesticides — you will understand exactly what I am talking about.
The grocery store will always be there. But your indoor salad bar? That is something only you can grow.
Have you tried growing hydroponic leafy greens at home? Share your experiences — successes, failures, and lessons learned — in the comments below.